Showing posts with label winter CHA 2012. Show all posts

Tuesday, March 27

Winter CHA '12 Flashback: Walnut Hollow

Happy Monday dear reader!  This time, I'd like to share with you a make-and-take card I made from the Walnut Hollow booth during Winter CHA in Anaheim in January. 


The product in focus was their Creative Metal, and we were to stamp an image on one. It was pretty interesting. I learned that you have to stamp really carefully as the metal sheet is pretty slick.  The image had to be heat set as well.


And you know what else made this fun?  I got to use decorative edge scissors to cut around my image.  I haven't use those in a long time!

'Til next blog!

Monday, March 19

Winter CHA Flashback: Impress Art Stamps

I learned two things when I tried the make-and-take at Impress Art Stamps during Winter CHA.  One, it is not that hard.  Two, it takes time to get used to the noise.  The bang of metal to metal sure is not so good to the ears.  But once you get the hang of it, and you see the final result - you can say it's worth it.


Before I show you what we were able to make, I really want to say how good the demo artist was for Impress Art.  She very well explained how to use the product, and her execution was really good.  Her approach was very friendly and candid, but made sure to point out the great things about the product.  I can say that she gave the best demo out of all the make and takes that I did that day.

Anyway, here are the pendants that my sister and I made:


After the make-and-take, they gave us a freebie metal stamp to play with at home.  Who doesn't like freebies?!?? 

I find Impress Art Stamps good for metal art and jewelry making.  You can also use them to personalize metal embellishments for card making and scrapbooking.  Do I want to invest on these?  Not for now.  The price for each set is too much for me ($8 per stamp or $50 per set MSRP).  I need more convincing.  If I am a jewelry maker, maybe.  But since I'm more of a paper gal, they're quite in the bottom of the list.

'Til next blog!

Tuesday, March 13

Winter CHA '12 Flashback: MEPXY Design Marker

I saw two other brands of markers during the Winter CHA convention, apart from Copics.  To be honest, I wasn't really interested to try them out.  But since I'm there to blog about my experience, I tried to open my mind and observe.  

One of the brands is Mepxy, which is distributed by Creation Supply


They are alcohol markers as well, and claims to work on almost any surface.  There are two kinds - the Design Marker (fine tip and chisel tip) and the Brush Marker (brush tip and chisel tip).  You can get more information in the Mepxy website

For their make-and-take, they focused on using the markers on foil, to be used as an accent for a card.  I let my sister sit and make the card, as I observed how the markers worked.  


And the big question:  Is there a difference between Mepxy and Copic?  To be honest, I really don't know... and I really don't care.  I think it's all in a matter of preference.  But since Copics have been in the scene for a long time, Mepxy will have a lot of catching up to do if it claims to do everything it says.  Alcohol markers are not cheap, and if people have bought a lot of them, it's going to be hard to switch to another brand.  However, it also gives people who are just starting in this scene more choices.  It is always nice to have choices.   
 
And I will definitely be watching.

'Til next blog!

Thursday, March 8

Winter CHA '12 Flashback: ALUMOSAICS

I have seen lots of projects using soda cans, but I found something new and different at the Winter CHA.  The moment I saw the beautiful artwork when I passed by Alumosaic's booth, I just had to stop, look and inquire about this really cool idea.


What you do basically is cut cans in small rectangles, and put them together to form a picture.  It sounds easy, but really it's not.  Because you have to have the right color, shades and drawings on the aluminum to achieve the picture you want.


A new item has just been added in my to do list.  Right now, I cannot access the Alumosaics website, but when I do, I'm thinking of buying their instruction DVD.

'Til next blog!

Wednesday, March 7

Winter CHA Flashback: GCD Studios

I got home from work determined to update my blog... but I fell asleep on the couch.  So here I am at 10:20 pm.  Honestly, I don't want to go back to bed anymore.  But I have to.

Anyway, I really enjoyed hanging out at the GCD Studios during Winter CHA. 


Their make-and-take was a mini scrapbook album using elements from the Splendor Collection.  I like the concept of their make-and-take.  First you get to have your photo taken.  Then they will give you a copy of your photo so you can use it in the mini scrapbook album.  The fun photo is already a souvenir by itself.


The pages of the album are sewn together - I really like that extra mile to make the album extra special.


And without further ado, here's the cute mini album we made:


This album is one of my favorite make-and-takes from this year's Winter CHA. 

'Til next blog!

Saturday, March 3

Winter CHA '12 Flashback: Silhouette CAMEO

I've known the name Silhouette from the line of die cut machines in the market from years ago.  And for this year's Winter CHA, they featured the Silhouette Cameo.  It is an electronic die cutting tool which you can hook directly to your computer, just like the previous versions.  But this one is a lot better and can do a lot of more fun stuff.  It can cut a variety of media from vinyl, cardstock, heat transfer material, magnet paper and fabric.  I really loved how they set up their booth to showcase their latest products.  You can see how it works from start to finish. 


Their make and take is a very nice fabric sling bag, adorned with images cut on a heat transfer material via the Silhouette Cameo.  The first step is to choose a design that you want on your sling bag. 


After that, the image from the computer is then transfered to the Silhouette Cameo, which is then cut on a heat transfer material.  You also have a choice between a smooth or flocked heat transfer material.  Since the sling bag was grey, I picked "white" and "flocked".  I was impressed on how the smallest details were cut sharply on the material. 

Choosing the design and cutting the image was easy.  However, peeling off the negative of the image took time and patience.  You will really need a sharp pointy tool to be able to do it well, and not ruining the image.  Silhouette came out with a tool for that called the HOOK.  I'm sure anything similar will work just the same.  

There was a long line of people waiting for their images to be transferred on the sling bags.  That was a good chance to see how everything works.  They used a special kind of pressing iron to make the transfer onto the fabric faster.  I asked the lady in charge, and she said that a regular iron is good to use as well.


Once the image is cool, then you can peel the plastic off.  The image stayed on to the fabric during the process.  I was relieved.  I used this sling bag right away, and all through my travels from California back to Michigan. 


The image was intact the entire time.  And when I got home, I washed the sling bag in the washing machine and dryer.  The image is still nice and solid on the fabric after washing.  I guess I can say that the heat transfer material really works good.

From the beginning, I have been leary of die cut machines that you cAN hook to the computer.  Everytime I do a research about those types of machines, there are always complaints from users and how they are not compatible with some operating systems and programs.  I didn't want to deal with that, that's why I'm still stuck with my Cricut Expressions (the original one).  Now that I have seen the Silhouette Cameo, and how it works with a computer, I'm considering on getting one.  Sometime in the future if I get a bigger craft room, I would like to invest on this machine.

'Til next blog!

Friday, March 2

Winter CHA '12 Flashback: Teresa Collins

There was a certain kind of atmosphere when I was at the Teresa Collins booth.  Seeing her in person felt like seeing a celebrity.  I even had the urge to have a photo taken with her.  But I was able to fight it.  Mainly because I was too shy to approach her.


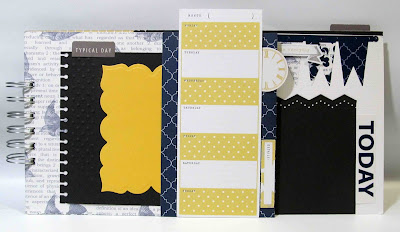
Their make-and-take was a 6 x 12 scrapbook album featuring select elements from her Everyday Moments line.  I was like... wow!  A scrapbook album. 


You would think that it would take a lot longer to do this make-and-take project.  Well, you are right.  But what they did was help you assemble the pages and bind them together, then they gave you the embellishments to finish each page yourself at home.  The kit came with this very easy to follow instructions:


And because we had another snow day yesterday, I was able to finish this fabulously designed album.  I made sure to use each and every element in the sticker and die-cut sheet that came with, and added some touch of my own.  The photos are shown from cover to back.


Finishing this album gave me that feeling of an extension of the Winter CHA in my planet.  And I loved that feeling.

'Til next blog!

Thursday, March 1

Winter CHA '12 Flashback: Tattered Angels

Hello crafty friends!  Today I want to share with you a make-and-take tri-fold card from the Tattered Angels booth in the Winter CHA in Anaheim this year.  Their main feature was the Plain Jane line.  I can still picture where their booth is exactly in the very big Anaheim Convention Center.


My favorite memory while making this card was the guy next to me, making one as well.  I have to say that if a guy is interested in making a card like this, then the product must be really good and interesting.


I love all the elements that they put together for this card.  And I definitely love playing with the Plain Janes.  Everytime I see this card, it makes me want to play with all my Tattered Angels products on hand.

'Til next blog!